The World’s First Low-Cost 3D Surface Profiler:
The Profilm3D
- Overview
- For Roughness
- vs. Stylus
- Specifications
- Price List
Optical profilers have many advantages over Dektak® and Alpha Step® stylus profilometers:
Optical Profilers Measure Over Large Areas Quickly
In the same few seconds that it takes to make a stylus-profiler line scan, the Profilm3D measures an area that's several square millimeters. Roughness calculated with the resulting area scan produces measurements that are statistically more significant and representative of the surface than those from a line scan. If you're using a stylus profilometer to scan the same size area, be prepared to spend several minutes waiting (and hope that you have your scan parameters set right!)
Optical Profilers are Easy to Use
Once your measurement recipe is set up (which our experts are happy to help you do), just sit your sample on the Profilm3D stage and click the Measure button. If you're interested in measuring a particular microscopic location, the Profilm3D’s automated XY stage makes it easy to find (use the software buttons to move the stage or use the optional SpaceMouse® as a joystick). Easier still, as long as your area-of-interest is within the Profilm3D’s big 2mm x 1.7mm field-of-view (with a 10x objective lens), you can easily analyze different areas.
Non-Contact Means Non-Flat Samples Can Be Measured
Because optical profilometry is a non-contact technique, you can easily measure curved and other non-flat surfaces. Shape removal (aka form removal) and filtering come standard with the Profilm3D and can easily be added to your recipe - making measurement of surface finish, texture, and roughness of curved surfaces fast and easy. Profiles can also be leveled post-scan – another function that can be made automatic by adding it to one of your measurement recipes. In addition to all this, being a non-contact method means that optical profilers won't damage your soft and delicate films the way contact stylus profilers do.
No Consumables
If you have a stylus profilometer you know that tip damage is a constant concern, and that tip replacement isn't quick or cheap. In contrast, optical profilers do not contact your sample and are about as fragile as your average microscope. The Profilm3D light source is an LED, so there are no lamps (or anything else) to periodically replace.
Optical Profilers are Fun!
You get to see a visual 3D representation of your sample – not just the squiggly line of the typical stylus profilometer trace. And with a SpaceMouse®, your 3D images are easily manipulated in all three dimensions.
Example
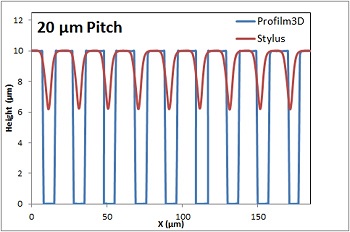
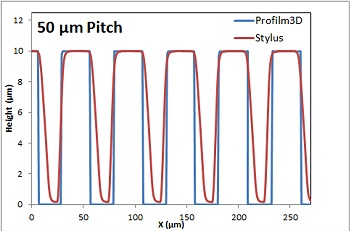
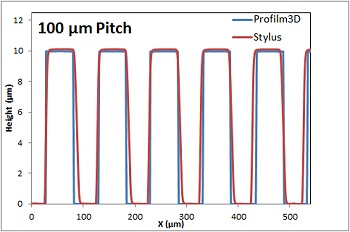
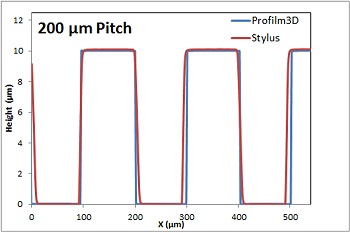
The step-height standard that’s included with the Profilm3D has patterns to calibrate lateral dimensions. The patterns are four groups of 10-μm-tall lines that have 200, 100, 50, and 20 μm pitch. The Profilm3D with a 10x Mirau objective can comfortably measure each of these pitch patterns. In contrast, a KLA-Tencor D-100 stylus profilometer struggles to measure less than a 100 μm pitch:
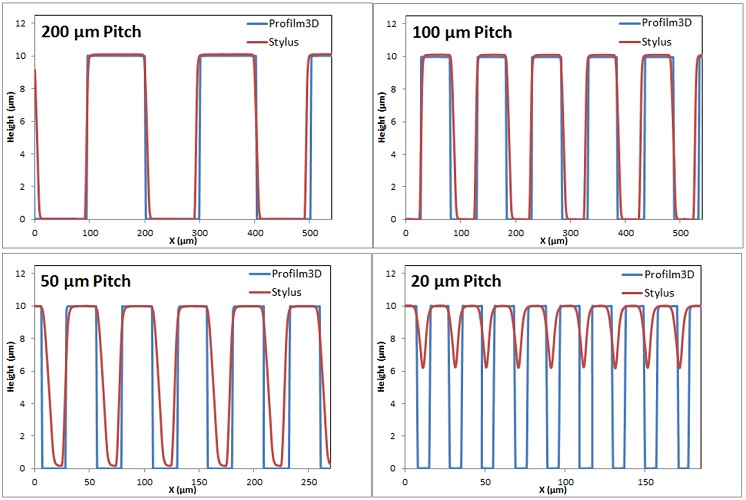
Figure 1: Line profiles of 10-µm-tall lines with a pitch of 200, 100, 50, and 20 µm, respectively. The blue lines are from the Profilm3D, the red lines from a KLA-Tencor D-100 stylus profilometer. Note that the x-axis scaling is adjusted for the 50 and 20 μm pitch for better clarity. The radius of curvature of the stylus becomes more and more in play when the pitch gets smaller. The size of the tip means it cannot penetrate through to the bottom of each trench. As a result, the stylus profilometer would return incorrect height or depth information. This is in contrast to the Profilm3D, which records steep walls and sharp edges all the way down to 20 μm pitch.
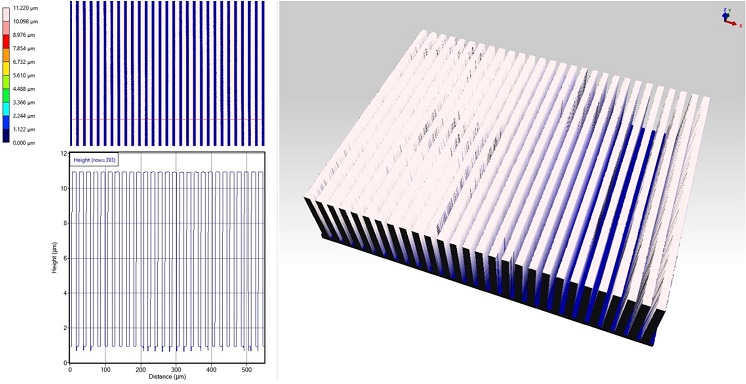
Figure 2: A 3D scan from the Profilm3D of the 20 µm pitch pattern.

